


Royal icing run-outs are a lovely way to decorate a cake, and also are a great help to the busy or novice cake decorator, as you make them in advance. This helps save time when you bake and decorate the cake; also (and perhaps more importantly for some people) you create these on a cake board, and place them on the cake when they are set – so if they go wrong you can start again without messing up the cake!
I’d never really done this before (though I had flooded biscuits with royal icing which is a similar technique) so it was an interesting thing to cover in my cake decorating class at South Thames College last term.
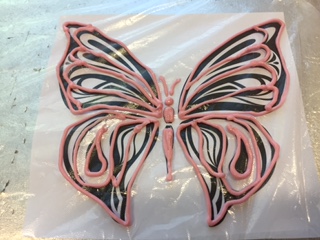
To start you need a template; this can be something you’ve drawn yourself or printed out from the internet but it’s much easier with a pattern to follow. Ideally one with strong black lines and spaces in between; some of the class used a Hello Kitty picture while I did this butterfly.
The first question is how to make royal icing for piping and flooding? There are a few ways, usually using egg white though you can find vegan recipes online (try here for instance).
If you can get albumen from a cake decorating shop (this is another name for egg white but can be bought in pasteurised powder form) you can make smaller quantities, but if you are using actual eggs, here’s a recipe that will make a bowl of royal icing:
175g icing sugar
1 large egg white
1 tsp lemon juice
Carefully beat the egg white with the icing sugar until you can then use a hand mixer without the powder going everywhere! Then add the lemon juice and mix until incorporates; the mixture should be slightly stiff. It will set if left out so cover with clingfilm whenever it’s not in use.
Using a small piping bag, which you can buy or make by folding greaseproof paper (you probably need to watch a YouTube video rather than read my attempt to explain).
Decide which colours you want to use and separate the icing into as many bowls as you need, and colour with a little gel food colouring (preferable to liquid colours).

Place a piece of cellophane over your template. The easiest way to do this is cut open an A4 file pocket. It’s a good idea to lightly rub down the cellophane with oil or trex so the icing doesn’t stick.
You don’t need a nozzle on your piping bag – the bag will probably be too small anyway. Just snip off the end and carefully squeeze so you have a line of icing to follow the outline of your template.
Allow to set for a few minutes then add some water to thin down whichever colour icing you want to use to fill in the sections in the middle of the design. Use a piping bag again for precision; you can use a cocktail stick to help nudge the icing into any corners. The filler icing needs to be in a quite thick layer so you can pick the design up when it’s set. For this reason, you need to make sure that you don’t leave any gaps.
All lines need to be connected to the outside outline as well – so with the butterfly I had to change some of the patterns on the wings so they were connected to the outer line. Otherwise you will find that when you pick up your run-out when it’s dry, some of the design will remain on the board!
Leave to set overnight or longer – we had to leave ours a week between cake decorating classes but it shouldn’t take that long! You can then carefully lift the run-out off of the cellophane, and use it on top of a cake. These also look really good standing up around the side of a cake depending on what design you have chosen.


0 (mga) komento:
Mag-post ng isang Komento