


Last year I signed up for a wedding cake decorating course at Sutton College of Learning for Adults (SCOLA) – I’d already done a brilliant one at South Thames college where I decorated these cakes.
When I saw a course at SCOLA, which is actually my local college, that was aimed at an intermediate level I thought it would be a great way to practice and gain new skills. And then I got engaged and decided I was going to partly make and decorate my own wedding cake, so hoped the course would come in very handy!
In the first session we covered brush embroidery, though I was a little disappointed overall. I have done this before and think that what we did at South Thames college was much better – both in terms of the design but also the fact that at South Thames, we covered a dummy cake with sugarpaste and did the brush embroidery on the cake itself, whereas at SCOLA, we did it on a covered cake board. I think doing it vertically is harder and looks a lot better than doing it horizontally and I wasn’t particularly proud of how it turned out.
Brush embroidery can look very pretty. You use royal icing – which can easily be made from regular icing sugar and egg white. We were advised to use egg white powder as it’s safer; you can buy packets of albumen or meriwhite – a powdered egg white substitute – from cake decorating shops, but as I only needed a small quantity and wasn’t sure I had time to order online, so I bought some Dr Oetker egg white powder from Sainsbury’s. You can buy boxes of royal icing sugar which you just need to mix with water, as there is egg white powder in it already, but my cake decorating tutor said it doesn’t dry quite as hard and while it’s convenient and good if you only need a small amount, for decorating a wedding cake she would always make her own.

The tutor provided us all with a template of a rose, which we were instructed to copy onto tracing paper and then to trace onto the covered cake board. I asked what we would do if it was going onto a cake to be eaten – I’ve been told before you can’t put pencil on real cakes, and instead have to do a very slow, painstaking process of marking out the pattern with a pricking tool. So I was surprised when my tutor said a small amount of pencil on a cake was fine – and I’ve since read online (eg on the Paul Bradford Sugarcraft School website) that using pencil on cake is perfectly safe. I’d be careful to make sure the pencil isn’t visible though – if you were serving the cake and someone could see the pencil marks they might worry! Other options would be using an edible ink pen, or using a cutter to make an impression on the fondant before it hardens – though I know you won’t always have a cutter in the shape of the design you want!
The tutor provided us all with a template of a rose, which we were instructed to copy onto tracing paper and then to trace onto the covered cake board. I asked what we would do if it was going onto a cake to be eaten – I’ve been told before you can’t put pencil on real cakes, and instead have to do a very slow, painstaking process of marking out the pattern with a pricking tool. So I was surprised when my tutor said a small amount of pencil on a cake was fine – and I’ve since read online (eg on the Paul Bradford Sugarcraft School website) that using pencil on cake is perfectly safe. I’d be careful to make sure the pencil isn’t visible though – if you were serving the cake and someone could see the pencil marks they might worry! Other options would be using an edible ink pen, or using a cutter to make an impression on the fondant before it hardens – though I know you won’t always have a cutter in the shape of the design you want!
We folded our own piping bags which is hard to explain but very useful if you are able to do this (a lot cheaper than buying piping bags, and the disposable plastic piping bags I use for buttercream are far too big for royal icing work). We coloured some royal icing by spreading it onto a tile (just a regular bathroom tile) with a palette knife which was an interesting technique I hadn’t done before, and worked well.
You don’t need a nozzle in your piping bag, just snip off the end so you have a very small opening and can pipe a fine line. We followed the outlines of the rose which were numbered so you start from the outside and work in – apparently this helps give more of a 3D effect but I didn’t really notice it. They key to getting the brush embroidery right is to only do one line at a time. Royal icing dries very quickly and if you piped the outline of this whole flower, you would find the icing had dried before you could do anything.
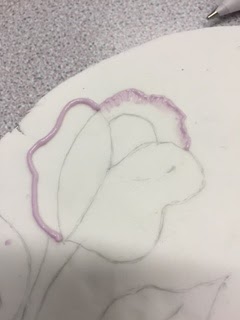
So here’s what you do: pipe a line, and then take a small artist’s paintbrush and gently brush the icing inwards. Try to keep the edge of the line intact and brush from the middle – it’s not easy when you have a thin line but it looks better this way. When you’ve finished, pipe the next line and repeat.
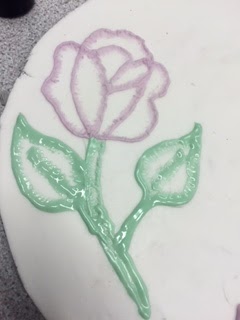
I didn’t really like what I did for two reasons: firstly, when I mixed my green royal icing it was a bit thick so I added some drops of water, but added too much. You can see from where I piped the stem of the rose that the icing was a little too runny which means it filled the narrow stem without me being really able to do any brushing. Secondly, I think the template is too big – the outline of the petals are so large that you are barely able to see any of the brush embroidery and it’s mainly white space.
I think this cake looks a lot better where we did very small flowers (incidentally, we embossed these by using a patchwork cutter before the fondant set) – and I also think it looks better in white on a white cake, even though it’s harder to see from a distance. It looks more elegant and intricate and for me just has a better overall effect. Still, it was good to be able to practice brush embroidery again and has given me some ideas for what I can do on my own wedding cake!


0 (mga) komento:
Mag-post ng isang Komento